Gutters play a crucial role in protecting your home from water damage by channeling rainwater away...
Learn how to easily set up your own DIY lawn sprinkler system using affordable products and save money on professional installation.
Benefits of DIY Lawn Sprinkler Systems
The below information is for above ground - easy do it yourself Amazon options or can request we (me) to.
*For inground irrigation and sprinkler system installations please message*
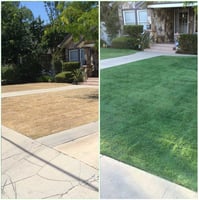
Installing a DIY lawn sprinkler system offers several practical benefits. One of the biggest advantages is having more control over your lawn’s watering schedule. With a timer, you can water at specific intervals so your grass gets the right amount of moisture without requiring daily attention.
A DIY sprinkler setup can also help reduce water waste and lower your water bill over time. By watering more efficiently, you can avoid overwatering while still keeping your lawn healthy and looking its best. Consistent coverage helps prevent dry patches and supports stronger, more even growth.
Another major benefit is flexibility. DIY systems can be adjusted to fit the size and layout of your yard, whether you’re watering a small backyard or a larger front lawn. You can choose the number and placement of sprinkler heads to improve coverage and target areas that may need more attention.
As your landscaping changes, your system can change with it. That makes a DIY sprinkler setup a practical option for homeowners who want an affordable, customizable way to maintain a healthy lawn.
Choosing the Right Sprinkler
When setting up a DIY lawn sprinkler system, it's essential to choose the right sprinkler head for your needs. 
Going to make it simple and recommend this one as it has the ability to cover 5000sqft in a circle or set to only a specific range. Get one for each side or just the back and front. Pair with a timer below and optional tripod for auto watering with ease.

If you have a narrow strip of grass then something like this may suffice.
Setting up the Hose and Timer
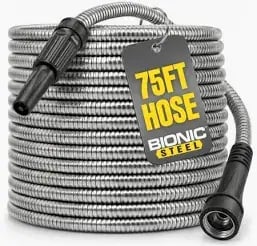
Once you have chosen the right sprinkler heads, the next step is setting up your Metal Hoses and WiFi zone activators or a simple DIY lawn sprinkler system. Start by connecting the hose to a water source, such as an outdoor faucet, and make sure the connection is tight and free from leaks. Then lay the hose along the areas you want to water, avoiding sharp edges, heavy foot traffic, or places where the hose could become damaged. If needed, use stakes or clips to keep it in place.
Optional tripod to extend coverage even more
If you want to increase coverage, an optional tripod. can help raise the sprinkler head and improve the spray pattern. This can be especially useful for watering over taller plants or reaching areas that are harder to cover with a ground-level sprinkler. Most tripods are adjustable, making it easier to set the height and angle for better results. Once attached, place the tripod securely and make sure it is stable before turning on the water.
A tripod can improve coverage in some situations, but it will not solve every pressure issue. Use 5/8-inch hoses instead of 1/2-inch so water pressure remains optimal. If you need to cover larger or uphill areas, thenautomatic water pumps can help the water flow with more force. If using a , then the water pumpwould turn on when the water turns on and simplfies the process. You may need to check withbackflow preventors as long hoses, especially uphill may force the water back into the waterlines of the house and you don't want hose water in your or other's homes. Check local ordinances or licensed plumber first.
For most homeowners, a more practical solution is to divide the yard into zones and water one area at a time using timers or WiFi zone activators. This helps normal household water pressure reach more of the lawn and plant beds without overloading a single line.
For plant beds, misting hoses (50ft (25x2) or soaker hoses. Dont forget splitters and additional activators for these zones if wanting to push a button to turn on.

Skip sprinklers or hoses, get a Sprinkler Hose! These are neat and simplify a lot , they're similar to misting hoses for plant beds but for lawn areas or plant areas away from a structure ( you dont want much water hitting a property or getting into the foundation so misting is better). These hoses may be better for narrow areas or temporary situations.
Simple ai slop example of 4 sprinklers, corners of house

How much to water?
Once you have some form of irrigation, consider the plants and their roots where the water intake happens. Newly established lawns only need quick frequent applications throughout the day until all grass has germinated. Once germinated, or if using Sod, longer and sparser time periods such as soak everything and let dry for days to encourage the roots to extend into the soil. Proper fertilization is needed to assist in this process as well - ideally every 4 weeks with slower release (consult or ask for service since CleanYardCare or service folks can get it at bulk rates that make it a better deal than you driving to the store to pick up and spread and is better quality)..
Be careful about overwatering your plants or lawn as root rot or fungus are real issues .
*Frequent light watering is CORRECT when first starting out. There are no roots below the very top of the surface.